
What Are the Standard Shuttle Court Measurements?
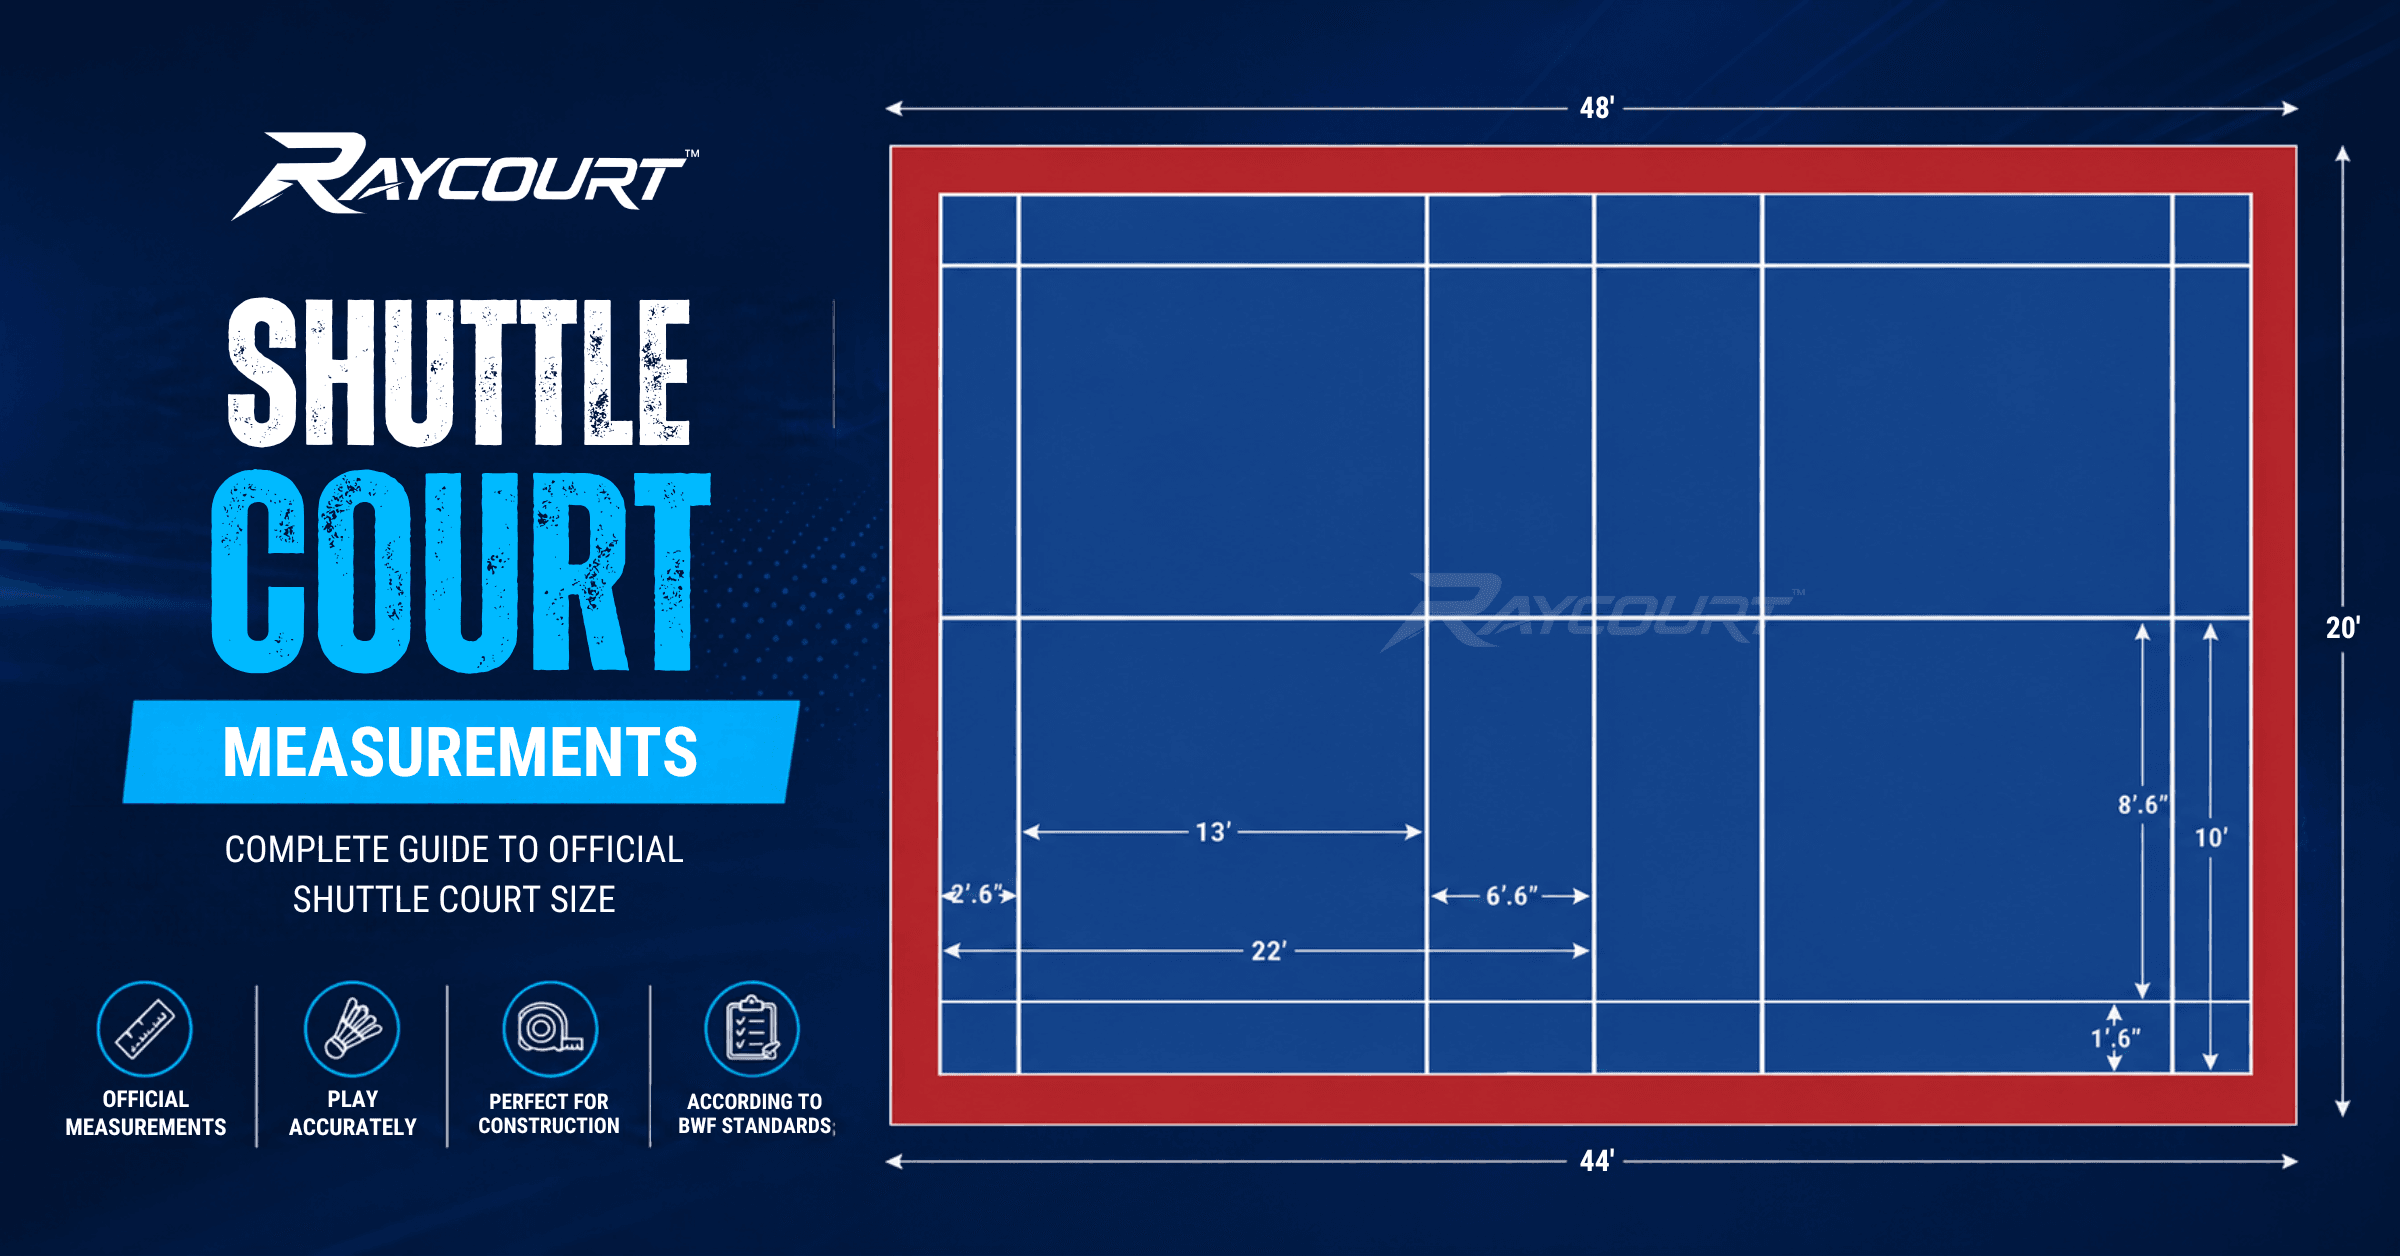
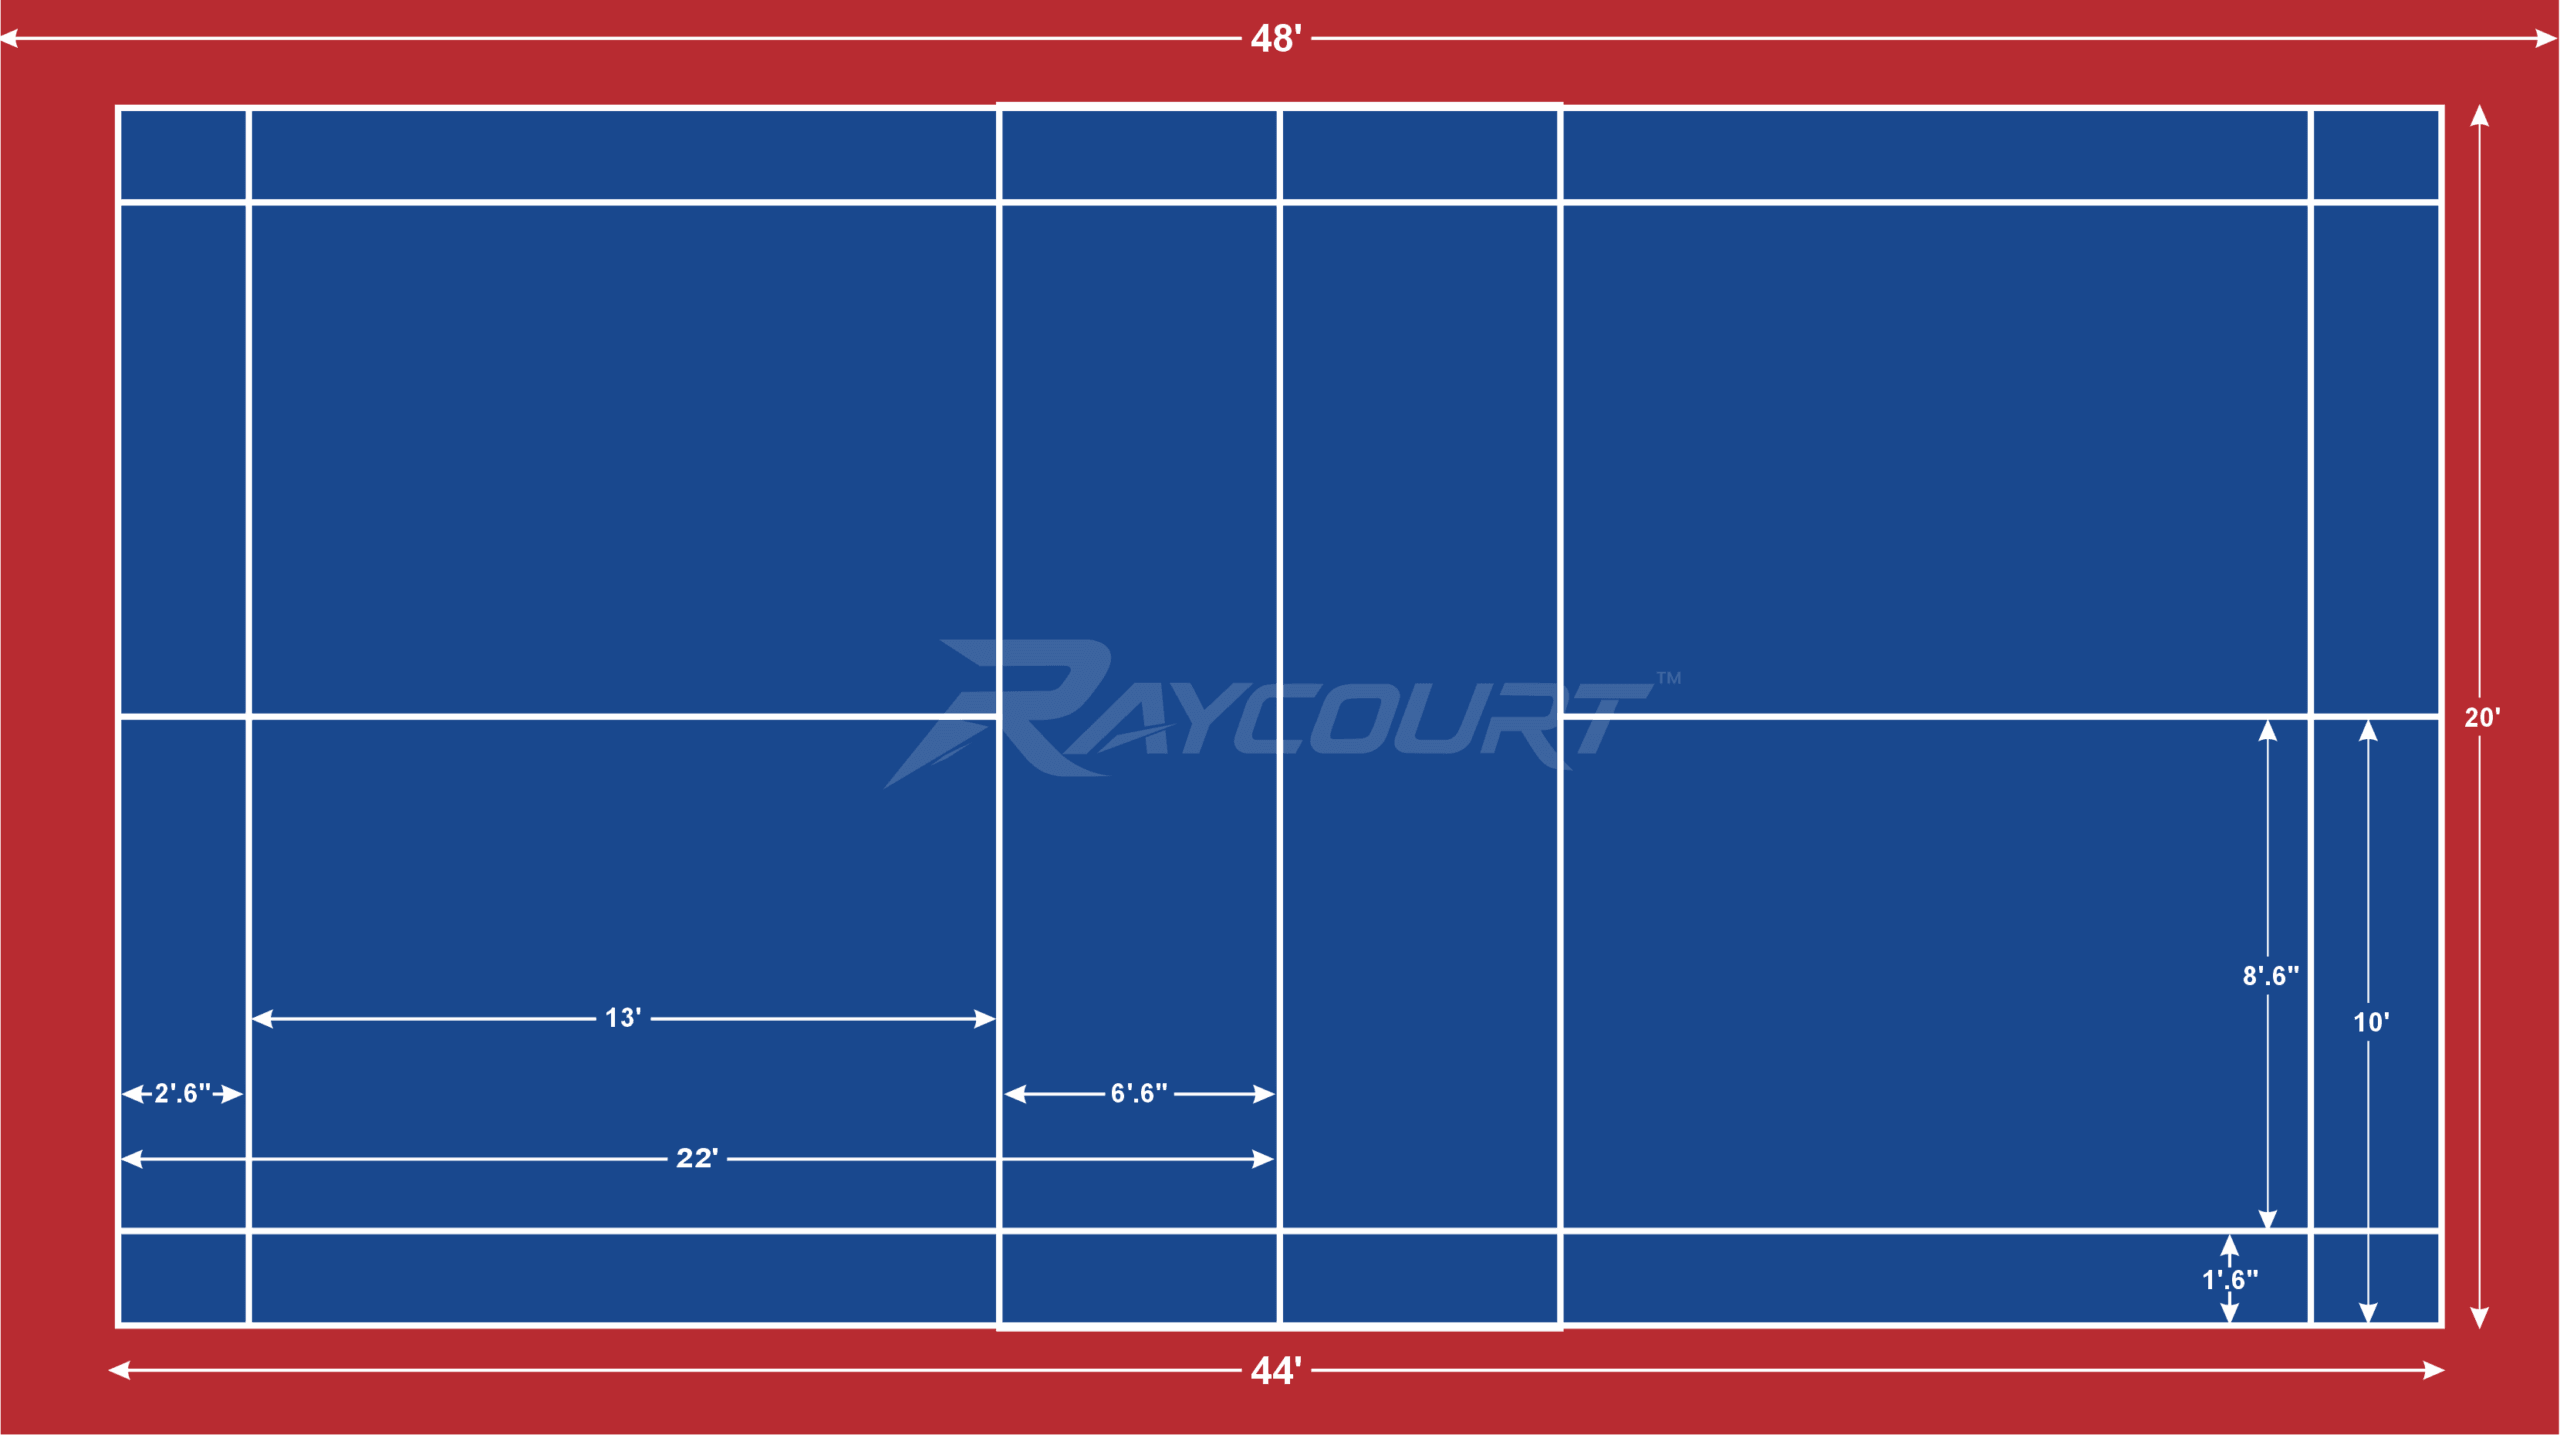
The standard shuttle court measurements for a doubles badminton court are 13.40 metres long and 6.10 metres wide (44 feet by 20 feet). A singles court uses the same length, but the width narrows to 5.18 metres (17 feet). The net stands 1.55 metres high at the posts and 1.524 metres high at the centre.
Those numbers form the foundation of every badminton facility in the world. However, the full picture includes more than length and width. A complete shuttle court also needs correct service lines, accurate line widths, safe run-off space, and enough ceiling height. If any of these measurements drift, the court plays differently, and players lose consistency.
This guide walks through each measurement in detail. First, you will see a quick reference table. Next, we explain how the lines work and why the dimensions matter. After that, we cover clearance, ceiling height, and lighting. Finally, we show how to mark a court accurately and how a quality acrylic surface supports every dimension.
Raycourt manufactures sports court flooring material. We do not install courts. Instead, we supply the surface material, and your installation professionals apply it and mark the lines. That separation gives us a clear view of what installers and facility managers need to get the measurements right.
Shuttle Court Measurements at a Glance
Before we explore each dimension, review the table below. It collects the core numbers in both metric and imperial units.
| Measurement | Metric | Imperial (approx.) |
|---|---|---|
| Court length (singles and doubles) | 13.40 m | 44 ft |
| Court width (doubles) | 6.10 m | 20 ft |
| Court width (singles) | 5.18 m | 17 ft |
| Length of each half court | 6.70 m | 22 ft |
| Short service line distance from net | 1.98 m | 6 ft 6 in |
| Doubles long service line from back boundary | 0.76 m | 2 ft 6 in |
| Side alley width (doubles only) | 0.46 m | 1 ft 6 in |
| Line width | 40 mm | 1.6 in |
| Net height at posts | 1.55 m | 5 ft 1 in |
| Net height at centre | 1.524 m | 5 ft |
| Doubles playing area | 81.74 m² | 880 sq ft |
Keep this table handy. Whether you plan a new hall or renovate an existing one, it works as a quick checklist. Moreover, it helps you spot errors early, before anyone paints a single line.
Expert Tip: Always work in one unit system during layout. Mixing metres and feet causes small rounding errors, and those errors add up across a long court.
Understanding the Full Shuttle Court Layout
A badminton court looks simple at first glance. It is a rectangle with a net across the middle. However, the internal lines create several distinct zones, and each zone has a job. Once you understand the logic behind the layout, the numbers become easy to remember.
Court Length: 13.40 Metres
The court length runs from one back boundary line to the other. The measurement stays at 13.40 metres for both singles and doubles. The net sits exactly at the midpoint, so each side of the net covers 6.70 metres.
That length rewards a mix of power and touch. Players can clear the shuttle to the back boundary with a strong overhead shot. Meanwhile, a delicate net drop lands just over the tape. The length creates room for both styles, and that balance defines the sport.
Court Width: 6.10 Metres for Doubles
The doubles court measures 6.10 metres from one side boundary to the other. This width includes two narrow side alleys. Doubles players use the full width, so they cover more lateral space as a team.
Because two players share each side, the extra width keeps rallies fair. Two defenders can protect the court without crowding each other. As a result, doubles rallies often feel faster and more tactical than singles rallies.
Court Width: 5.18 Metres for Singles
The singles court narrows to 5.18 metres. That removes the 0.46-metre side alleys on each side. Players in singles cover the entire length, but the inner side lines mark the boundary.
This narrower width forces singles players to move more in the front and back directions. Consequently, singles demands strong footwork and stamina. The court also feels longer in singles, because the shuttle has less room to hide on the sides.
Half Court Dimensions
Each half of the court measures 6.70 metres by 6.10 metres in doubles. In singles, the half court measures 6.70 metres by 5.18 metres. Coaches often use half-court sections for drills, because the smaller space keeps players focused.
If you plan a training zone, consider marking extra lines on half courts. However, always keep them visually distinct from the official lines. Different colours help players avoid confusion during match play.
Shuttle Court Lines and Their Exact Measurements
The lines do more than mark the edges. They divide the court into service areas and define what counts as in or out. In addition, they guide players who read the court by sight during fast rallies. Accurate line measurements matter for every serve.
Line Width and Colour
All court lines measure 40 millimetres wide (about 1.6 inches). The line colour should contrast clearly with the surface. White and yellow both work well on most acrylic colours. Some facilities choose other bright colours, as long as visibility stays strong.
The line belongs to the area it defines. In other words, a shuttle that lands on the line counts as in. This rule makes line width important. A line that runs too thin or too wide changes the effective court size.
Outer Boundaries
Two outer side lines and two back lines form the outer rectangle. The measurement runs from the outside edge of each line. That detail matters when you lay out the court. If you measure from the centre of the line instead, the court comes out slightly too small.
Installers should mark the outside edge first, then fill the line inward. This method keeps the full playing area at the correct size.
Singles Side Lines
The inner side lines sit 0.46 metres inside each outer side line. They define the singles width of 5.18 metres. In doubles, players ignore these lines during rallies. However, they still matter for the serve, as the next section explains.
Short Service Line
The short service line runs parallel to the net and sits 1.98 metres from it. A serve must travel past this line to count as legal. The line stretches across the full width of the court.
That short distance keeps the serve low and controlled. Because the server must clear the line, the serve cannot drop softly at the net without penalty. This rule shapes how players serve in every match.
Long Service Line for Doubles
In doubles, the long service line sits 0.76 metres inside the back boundary. A doubles serve that lands beyond this line falls out. The rule shortens the effective serving area and limits high, deep serves.
In singles, the back boundary itself acts as the long service line. Therefore, singles servers can hit deeper than doubles servers. This difference explains why the court carries two sets of back lines for doubles play.
Centre Line
The centre line runs from the short service line to the back boundary. It divides each half into a left service court and a right service court. Each doubles service court measures 3.05 metres wide. Each singles service court measures 2.59 metres wide.
Players serve diagonally across the net into the opposite service court. As a result, the centre line guides every serve. A misplaced centre line creates uneven service courts, and that error frustrates players quickly.
Why Does the Doubles Long Service Line Sit Closer to the Back?
Many new players ask why doubles has a shorter serve zone. The answer comes down to pace and strategy. In doubles, a deep serve to the back line gives the server’s opponents a big attacking chance. Two players share the court, so an attacking clear is easier to defend against.
The 0.76-metre reduction discourages high, deep serves. Instead, it encourages low, flat serves that keep the rally fast. In short, the shorter zone makes doubles more aggressive and more exciting. The measurement shapes tactics as much as it shapes geometry.
Ready to build a court that performs for years to come?
Connect with Raycourt for sports flooring systems built for your project.
Net and Post Measurements
The net splits the court, and its height sets the difficulty of every shot. Therefore, net measurements deserve the same care as the floor lines.
Net Height
The net stands 1.55 metres high at the posts. At the centre, it dips slightly to 1.524 metres (5 feet). That small sag keeps the net taut and even. Officials check both heights before every serious match.
To measure the height, use a rigid measuring stick or a marked pole. Measure from the surface to the top edge of the net tape. Always check the centre point separately, because the sag varies with tension.
Net Length and Depth
The net measures at least 6.10 metres long, matching the doubles width. It is 760 millimetres deep. The top edge carries a white tape, folded over a cord or cable. The tape measures about 75 millimetres in total depth.
The mesh should be dark in colour and have a fine, even weave. That choice helps players track the shuttle against the net. Furthermore, a consistent mesh size prevents the shuttle from catching in gaps.
Post Placement and Height
Two posts hold the net at 1.55 metres high. Players place them on the doubles side lines, even during singles. The posts must stay firm and should not lean during play.
Post placement matters for both singles and doubles. If you move the posts inward for singles, the net leaves a gap along the outer edges. The official rule keeps the posts on the doubles line at all times. Some clubs add a narrow tape strip at the singles line for reference.
Expert Tip: Check the net height at both posts and at the centre every session. Cables stretch over time, and even a small change alters shot trajectories.
How Often Should You Re-Measure Your Net?
Serious clubs check net height before every match or training block. Casual facilities can check weekly. The task takes only a few minutes with a measuring stick. However, it prevents subtle differences from creeping into your play.
If you notice the net sagging more than usual, tighten the cable before you play. Also inspect the posts for movement. A stable net gives every player the same conditions, and that consistency supports fair games.
Run-Off Space and Clearance Around the Court
The playing area of 13.40 by 6.10 metres tells only part of the story. Players need extra room around the court to move safely. Shuttle court measurements must therefore include the run-off zone, not just the lines.
Recommended Clearance Behind the Baseline
Players often retreat well past the back line to chase a clear. Therefore, you need enough space behind each baseline. Many governing bodies recommend at least 2 metres of free space behind each back boundary in competitive halls. Recreational facilities sometimes use less, but more space is always safer.
Extra room reduces collisions with walls and equipment. It also lets players commit to shots without hesitation. Consequently, generous clearance improves both safety and performance.
Recommended Clearance Beside the Sidelines
Side clearance works the same way. A player who lunges for a wide shot needs room to recover. Aim for at least 2 metres on each side in serious venues, when space allows. For a single court, the overall footprint then comes to about 17.4 metres by 10.1 metres.
That larger footprint covers roughly 175 square metres. It gives you a realistic figure for planning the hall floor. Always confirm final clearance with your governing body or facility standards.
Spacing Between Adjacent Courts
Multi-court halls need spacing between courts. If two courts sit too close, players and shuttles collide across the boundary. Many facilities leave about 2 metres between neighbouring courts. In tournament halls, planners often add even more.
Some venues use low dividers or netting between courts. Those barriers work well, but they still need clearance on both sides. Otherwise, the divider itself becomes a hazard.
Can You Reduce Run-Off Space in a Small Hall?
Sometimes a hall simply lacks space. In that case, you can reduce clearance, but you should do so carefully. First, prioritise the baseline. Players run backward more than sideways, so the back area needs the most room.
Next, pad any hard surfaces near the court. Wall padding reduces injury risk when players slide out of bounds. However, reduced clearance always limits the level of play the court can host. Treat it as a compromise for recreational use, not for competition.
Ceiling Height and Overhead Clearance
A badminton shuttle travels high. Clears and lifts often reach the ceiling in low halls. As a result, ceiling height belongs in any complete discussion of shuttle court measurements.
Minimum and Preferred Height
Many governing bodies recommend at least 9 metres of clear height above the playing area. Higher-level venues often prefer 12 metres over the central zone. Lower ceilings force players to hit flatter clears, and that changes the game.
Beams, lights, and ducts all count as obstructions. Therefore, measure the clear height from the surface to the lowest obstruction. Do not measure to the roof itself.
Why Height Matters So Much
The shuttle rises and falls steeply. A high clear gives players time to recover position. If the ceiling blocks that path, players lose an essential defensive tool. Consequently, low ceilings favour attacking styles and shorten rallies.
Moreover, low ceilings increase the risk of the shuttle striking fixtures. Each strike interrupts play and frustrates players. A clean, high ceiling keeps rallies flowing.
Lighting Placement
Lights should sit outside the main flight path of the shuttle. Ideally, they run along the sides of the court rather than directly above the centre. That layout prevents glare and keeps the shuttle visible against a clean background.
Lighting also affects how players read the surface. Matte acrylic finishes reduce reflections and glare. In turn, players see the shuttle and the lines more clearly.
Expert Tip: Stand at the baseline and look up during a site visit. If lights or beams sit in your direct sight line, players will struggle during high clears.
Marking the Court: A Step-by-Step Approach
Accurate measurements only help if the marking matches them. Installation professionals handle this task after they apply the surface material. Raycourt manufactures the flooring, and your installation team completes the layout. This section explains the process so you can check the work.
Step-by-Step Marking Process
- Establish the centre point. Mark the midpoint of the court length at 6.70 metres. This point locates the net line.
- Draw the outer rectangle. Measure 13.40 metres by 6.10 metres. Remember to measure to the outside edge of the boundary lines.
- Check the diagonals. Both diagonals must measure about 14.72 metres. Equal diagonals prove the rectangle has true right angles.
- Mark the singles side lines. Place them 0.46 metres inside each outer side line.
- Mark the short service lines. Measure 1.98 metres from the net line on each side.
- Mark the doubles long service lines. Place them 0.76 metres inside each back boundary.
- Draw the centre lines. Run each one from the short service line to the back boundary.
- Apply the line paint. Fill each line to a width of 40 millimetres, using masking tape for crisp edges.
Using the Diagonal Check
The diagonal check is the fastest way to confirm squareness. For a doubles court, the diagonal comes to roughly 14.72 metres. For the singles rectangle, the diagonal measures about 14.37 metres. If the two diagonals differ, the rectangle is not square.
Installers can also use a 3-4-5 triangle to set a right angle. Scale the triangle up for better accuracy over a long distance. This old method still works perfectly on modern surfaces.
Choosing the Right Line Paint
Line paint should bond well to the acrylic surface and resist wear. It should also keep a matte finish, so the lines do not create glare. Always ask your surface supplier for compatible line products. Good compatibility keeps the lines sharp for longer.
Expert Tip: Mask the lines carefully, and remove the tape while the paint is still slightly tacky. This trick gives you crisp, straight edges without ragged borders.
Tolerances and Common Measuring Mistakes
Even careful crews make small errors. Understanding where mistakes happen helps you catch them early. Furthermore, it helps you decide what level of accuracy each facility needs.
Acceptable Tolerances
Governing bodies set tolerances for competitive courts. In general, the line positions should stay within a few millimetres of the official dimensions. Casual courts allow more flexibility, but accuracy still improves the playing experience.
As a rule, aim for the tightest tolerance your crew can reach. Tight work costs no extra effort if you plan the layout well. It simply requires patience and careful checking.
Frequent Errors to Avoid
Watch for these common mistakes:
- Measuring to the centre of the line instead of the outer edge
- Skipping the diagonal check after marking the outer rectangle
- Placing the short service line at the wrong distance from the net
- Confusing the singles and doubles long service lines
- Shifting the net line away from the exact midpoint
- Ignoring the slope or level of the surface before marking
Each error is easy to prevent. However, once the paint dries, corrections become slow and messy. Therefore, verify each measurement twice before you apply the final coat.
Surface Levelness
A court also needs a level surface. Even small slopes change how the shuttle bounces off the floor during scrambling rallies. They also affect footwork and player comfort. A flat, smooth base lets the acrylic surface deliver its best performance.
Base preparation happens before Raycourt’s material arrives on site. Your civil or installation team should confirm that the base is flat and cured. This step protects the accuracy of every measurement above it.
How the Surface Supports Accurate Shuttle Court Measurements
Measurements describe the geometry of the court. The surface determines how that geometry feels in play. Good synthetic acrylic flooring keeps the court consistent from line to line and season to season.
Consistent Pace and Bounce
Raycourt’s surfaces carry ITF Court Pace Classification. That classification helps players and coaches understand how the surface behaves. For badminton, consistency matters even more than pace. Players want the same footing on every part of the court.
A uniform surface makes the official dimensions meaningful. Otherwise, a fast patch or a slick patch in one corner would change how players move. Consistent acrylic material removes that problem.
Grip and Footwork
Badminton demands sudden starts, stops, and lunges. Therefore, the surface must offer reliable grip without grabbing the shoe. Acrylic surfaces provide that balance, because the textured top layer controls slide.
Good grip also lets players use the full 6.10-metre width confidently. They can push wide without fearing a slip. In other words, the surface unlocks the potential of the measured space.
Line Visibility and Contrast
Line paint sits on top of the acrylic layer. A matte, even base helps the paint bond and look sharp. Moreover, well-chosen surface colours make the lines pop. Popular badminton colour schemes use a green or blue playing area with a slightly different run-off shade.
The contrast between the playing area and the run-off also helps players judge distance. It tells them where the court ends before they cross the boundary. That subtle cue supports safer movement.
Durability Under Repeated Movement
Badminton involves constant sliding and pivoting on the same patches. Over time, weaker surfaces wear unevenly. Quality acrylic material resists that wear and keeps the line areas stable. As a result, the court holds its measurements and appearance for longer.
Does Surface Colour Change the Way You Read the Court?
Yes, it does. Players use colour contrast to judge depth and boundaries. A dark playing area with a lighter run-off makes the edge obvious. That visual frame helps players recognise the baseline instantly.
Additionally, colour affects how well the shuttle stands out. White shuttles show up clearly against green and blue backgrounds. Choose colours that support visibility, and pair them with high-contrast lines. This combination makes the shuttle court measurements easy to see and trust.
Designing a Multi-Court Badminton Hall
Many facilities build more than one court. Tournament halls, academies, and community sports complexes often place several courts side by side. Multi-court design adds new decisions about spacing and orientation.
Court Orientation
Courts should run in the direction that limits glare and distraction. In most halls, the long axis of each court runs along the length of the hall. This layout keeps players looking away from side windows and reduces glare.
If windows sit on the long walls, use blinds or frosted glass. Direct sunlight in a player’s eyes causes serious problems during high clears. Therefore, plan the light early in the design process.
Court Spacing and Layout
Place adjacent courts with at least 2 metres of clearance between the outer lines of one court and the outer lines of the next. Add extra space at the ends if the hall allows. A common layout groups courts in rows, with shared aisles for coaches and officials.
Consider the following planning points:
- Clear walkways for players moving between courts
- Umpire and line judge positions at competitive events
- Spectator zones away from the run-off areas
- Storage for nets, posts, and equipment
Planning for Multi-Sport Use
Many halls host several sports. A badminton court can share a surface with basketball, volleyball, or tennis. However, each sport has its own line pattern. Therefore, use different line colours for each sport, and keep the badminton lines distinct.
Acrylic surfaces suit multi-sport halls well, because they tolerate different movement types. Raycourt manufactures material that supports this flexibility. Your installation team then applies the correct line layout for each sport.
Expert Tip: Draw a scaled plan of your hall before you commit to a layout. A simple paper drawing often reveals clearance problems that a mental picture misses.
Ready to build a court that performs for years to come?
Connect with Raycourt for sports flooring systems built for your project.
Indoor and Outdoor Shuttle Court Measurements
The official court dimensions stay the same indoors and outdoors. However, the surroundings change how you plan the space. Each setting brings different challenges.
Indoor Courts
Indoor courts offer the most controlled conditions. Air stays still, and the lighting stays constant. As a result, indoor play delivers the truest shuttle flight. The challenges here involve ceiling height, lighting, and hall ventilation.
Ensure that ventilation does not create drafts across the court. Even a gentle breeze pushes a shuttle off course. Consequently, serious players prefer halls with carefully managed air flow.
Outdoor Courts
Outdoor courts suit casual and community play. They use the same dimensions, but wind becomes a major factor. Wind changes how the shuttle flies, and it makes accurate play harder.
Planners often place outdoor courts with the long axis pointing north to south. That orientation limits low sun in players’ eyes during morning and evening games. Additionally, wind screens along the sides can reduce gusts.
Outdoor surfaces face sun, rain, and temperature swings. Acrylic surfaces handle these conditions well because they resist UV and moisture. The measurements stay accurate, but the material must stay stable to protect the lines.
Semi-Covered and Shed Courts
Some facilities use roofed sheds with open sides. These courts combine shade with fresh air. They still need the same ceiling height as indoor halls. In addition, the roof must extend far enough to shelter the entire run-off area.
Shuttle Court Measurements for Training and Coaching
Coaches often adapt the standard court for drills and development. Smaller or modified courts help young players learn without exhausting themselves. Modified layouts also let coaches focus on specific skills.
Junior and Mini Court Layouts
Young children often struggle on the full 13.40-metre court. Coaches therefore use reduced court sizes and lower nets. These mini courts help beginners build confidence and technique.
If you add mini courts, mark them in a different colour. That way, the junior lines never confuse players on the full court. Moreover, keep the junior zones inside the run-off area only when safety allows.
Drill Zones and Target Lines
Coaches often place tape markers to train accuracy. For example, they mark deep corners, front corners, and mid-court boxes. These targets help players practise precision under pressure.
Temporary markers work best for this purpose. They leave the permanent lines untouched and clear. Furthermore, they let coaches change drills quickly between sessions.
Footwork Patterns
Footwork drills use the court’s dimensions as a map. Players move from the centre to each corner and back. The 6.70-metre half court gives a clear scale for these patterns. When the lines stay accurate, coaches can measure progress reliably.
A Practical Planning Checklist
Use this checklist when you plan or review a shuttle court. It combines every measurement discussed in this guide.
- Confirm the playing area at 13.40 m by 6.10 m for doubles.
- Check the singles width at 5.18 m, with 0.46 m side alleys.
- Verify service lines at 1.98 m from the net and 0.76 m inside the back boundary.
- Measure line width at 40 mm across all lines.
- Set the net height at 1.55 m at the posts and 1.524 m at the centre.
- Secure clearance of at least 2 m behind and beside the court, where space allows.
- Confirm ceiling height of at least 9 m, with more for high-level play.
- Position the lighting outside the shuttle’s main flight path.
- Prepare a level base before the surface material arrives.
- Check the diagonals after marking the court.
Following this list reduces errors and supports a smooth build. It also gives facility managers a simple audit tool for existing courts. Run through it once a year to confirm that everything still matches the standards.
Why Accurate Shuttle Court Measurements Matter
Some people treat the dimensions as a minor detail. In reality, they shape every rally. A court that runs even slightly short changes how players judge clears. A court with uneven service boxes creates arguments and doubt.
Accurate measurements also protect fairness. Players from different clubs can compete on equal terms. Coaches can trust the drills they design. Officials can make clear line calls without hesitation.
Finally, correct dimensions keep the facility ready for certified events. If you hope to host tournaments someday, start with accurate geometry. Retrofitting a court later takes far more effort than building it correctly at the start.
For the official rules and dimensions, consult the Badminton World Federation’s statutes and laws of badminton. The BWF sets the global standard that every measurement in this guide follows.
Frequently Asked Questions About Shuttle Court Measurements
A doubles court measures 13.40 metres long and 6.10 metres wide, which equals about 44 feet by 20 feet. The net stands 1.55 metres high at the posts and 1.524 metres at the centre. Lines measure 40 millimetres wide, and the outer edge of each line defines the boundary.
The singles court keeps the same 13.40-metre length but narrows to 5.18 metres wide. Players use the inner side lines as boundaries, which removes the 0.46-metre side alleys. In addition, the back boundary serves as the long service line in singles, while doubles uses a line 0.76 metres inside it.
Plan for at least 2 metres of clear space behind and beside the court in competitive settings. This clearance brings the overall footprint to roughly 17.4 metres by 10.1 metres. Recreational courts sometimes use less space, but more room always improves safety and performance.
Governing bodies commonly recommend at least 9 metres of clear height above the playing area. High-level venues often prefer 12 metres over the central zone. Measure the clear height to the lowest obstruction, such as a beam or light fitting, rather than to the roof.
The surface does not change the official dimensions, but it strongly affects how well the court delivers them. A consistent acrylic surface gives reliable grip, even pace, and clear line contrast. Raycourt’s ITF Court Pace Classified material supports that consistency, while your installation team handles the final marking.
Conclusion: Build Your Court on Accurate Measurements
Shuttle court measurements form the backbone of a great badminton facility. The 13.40 by 6.10 metre doubles rectangle, the 5.18-metre singles width, and the precise service lines all shape play. Net heights, line widths, run-off space, and ceiling clearance complete the picture.
To recap the essentials, remember these points:
- Measure to the outer edge of every line.
- Check the diagonals to confirm a square layout.
- Keep the net at 1.55 metres at the posts and 1.524 metres at the centre.
- Leave generous clearance on all sides.
- Provide enough ceiling height for high clears.
- Choose a consistent surface that supports grip, visibility, and durability.
Raycourt manufactures synthetic acrylic sports court flooring material that supports each of these goals. Our ITF Court Pace Classified surfaces give players a stable, reliable base for every rally. Pair our material with careful layout work from your installation professionals, and you will have a court that performs at its best for years.
Ready to build a court that performs for years to come?
Connect with Raycourt for sports flooring systems built for your project.